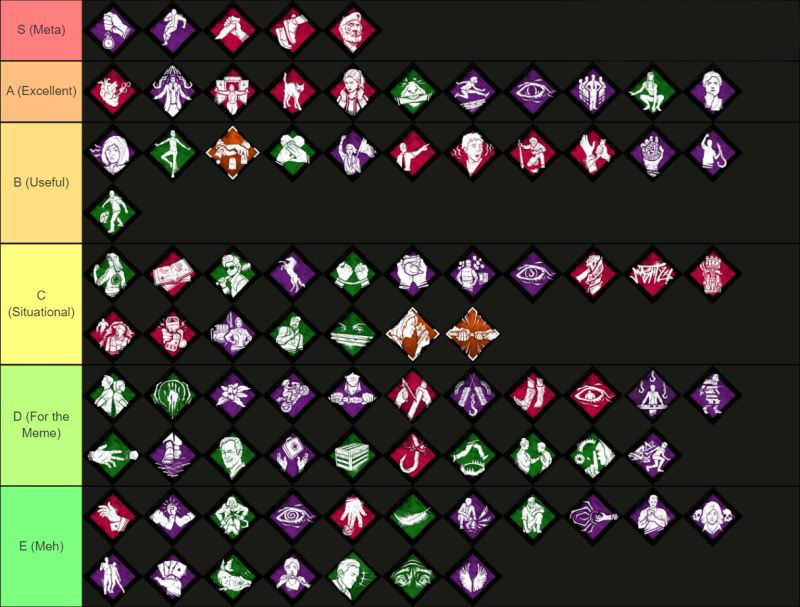
Survivors have a big pool of Perks they can choose from to create their own custom build. However, not all of the 89 Perks are as good as the others, and some are simply not useful as of today. So, what are the best Perks for Survivors after Patch 4.5.0?
The best Perks for Survivors consist of Borrowed Time, Decisive Strike, Iron Will, Unbreakable, Dead Hard, and Sprint Burst. Perks such as Prove Thyself, Soul Guard, Spine Chill, and Resilience are also very common on Survivor Perk builds.
Still, most of the Perks available are not Meta. For instance, Tenacity, Stake Out, or Babysitter are still useful but more situational compared to Borrowed Time or Sprint Burst. Note that most meta-relevant Perks are Teachables, which can be unlocked for all Survivors, by reaching level 40 of the character Bloodweb.
Here is a complete tier list of all Survivor Perks:
Best Perks for Survivors
#1 Borrowed Time:
You are fuelled with an unexpected energy when saving an Ally from a Hook within the Killer’s Terror Radius. For 10/12/15 seconds after unhooking a Survivor within the Killer’s Terror Radius, the unhooked Survivor is protected by the Endurance Status Effect.
Any damage taken that would put the Survivor into the Dying State will instead trigger the Deep Wound Status Effect, after which the Survivor has 20 seconds to Mend themselves. Taking any damage while under the effect of Deep Wound or if its timer runs out will put the Survivor into the Dying State.
“Probably stings like hell, but it ain’t gonna kill ya. Up and at ’em soldier. Time to move!” — Bill Overbeck
Borrowed Time is a Teachable Perk of William “Bill” Overbeck, which makes saving a Survivor from a hook, while the Killer is still close, much safer. If you unhook another Survivor while being in the Killers Terror Radius, the unhooked Survivor will be protected by the Endurance status effect.
During this effect, any damage that would put this Survivor back on the ground (Dying state) will instead trigger the Deep Wound status effect, and the player can continue to flee from the Killer.
Killer such as the Trapper of Pig will have a hard time catching up to the injured Survivor; however, fast/range Killers such as the Oni, Nurse, Hillbilly, or Huntress can still catch up.
#2 Dead Hard:

Activate-able Perk. You can take a beating. When Injured, tap into your adrenaline bank and dash forward quickly to avoid damage.
- Press the Active Ability button while running to dash forward.
- During the dash, you avoid damage.
- Causes the Exhausted Status Effect for 60/50/40 seconds.
Dead Hard cannot be used when Exhausted. You do not recover from Exhaustion while running.
“We were walkin’ through t’ginnel one night when a beer bottle flew past me, then another, and another. I thought to myself “Gonna ‘ave some fun ‘ere lads, let’s get stuck in!”. It were a right dust up, I swear down!” — David King
If you within a chase, and the Killer is coming closer, but you’re still too far away to the next Pallet or Window, equipping Dead Hard enables you to dodge a hit from the Kille to reach the Pallet.
If you reach a Pallet in time with Dead Hard, the Killer only has two options. Either he commits to the chase, taking the risk of wasting even more time, or leaving you to look for another Survivor.
#3 Decisive Strike:
Using whatever is at hand, you stab at your aggressor in an ultimate attempt to escape. After being unhooked or unhooking yourself, Decisive Strike will become active and usable for 40/50/60 seconds.
While Decisive Strike is active, when grabbed by the Killer, succeed a Skill Check to automatically escape the Killer’s grasp and stun them for 5 seconds.
- Successfully stunning the Killer will result in you becoming the Obsession.
While Decisive Strike is active, the following interactions will deactivate it for the remainder of the Trial:
- Succeeding or failing the Decisive Strike Skill Check.
- Repairing a Generator.
- Healing yourself or other Survivors.
- Cleansing a Totem.
- Sabotaging a Hook.
- Unhooking other Survivors.
Increases the odds of being the Obsession. The Killer can only be obsessed with one Survivor at a time.
“There’s nothing to be scared of.” — Laurie Strode
Tunneling an unhooked Survivor sometimes is a viable strategy for the Killer to win the game, even if it’s not funny for the unhooked player. However, if the player uses Decisive Strike, he can escape the Killers grasp and stun him for 5 seconds, giving him enough time to get away.
However, DS only becomes active for 40/50/60 seconds after being unhooked or unhooking yourself. If you want to save Decisive Stike for later, you don’t have to do anything when the Skill Check triggers. DS will then pop up the next time the conditions are met.
Because DS is such a strong Perk, Killers often leave you on the ground if they expect DS, until it deactivates after a minute.
#4 Sprint Burst:
When starting to run, break into a sprint at 150 % of your normal running speed for a maximum of 3 seconds.
- Causes the Exhausted Status Effect for 60/50/40 seconds.
Sprint Burst cannot be used when Exhausted.
You do not recover from Exhaustion while running.
When the Killer starts the chase and comes close, creating distance is not always possible, because Pallets and Vaults are limited. That’s where Sprint Burst shines, as you will sprint at 150% of your regular running speed for 3 seconds after the Perk activates.
With that speed boost, you can easily reach the next closest Pallet or Window. Killers without a range power or high mobility cant catch you while sprinting at 150%, so it almost fits in every common build. By the way, if you don’t have Sprint Burst available for your Survivor, you can also use other Exhaustion Perks, such as Lithe, Smash Hit, or Balanced Landing.
Another plus point for Sprint Burst is that it becomes available again after 40 seconds of Exhaustion. Unfortunately, Sprint Burst also activates without being in a chase, so there is always the chance that the Killer finds you while SB is still on cooldown.
#5 Unbreakable:

Past battles have taught you a thing or two about survival.
Grants the ability to fully recover from the Dying State once per Trial.
- Increases the Dying State Recovery speed by 25/30/35 %.
“Goddammit, I am seriously FUBAR!” — Bill Overbeck
Slugging is definitely one of the most unfun Killer strategies for Survivors, but there are a few anti-slugging Perks available. Among the anti-slug Perks, Unbreakable is one of the best, as it allows you to recover from the Dying State completely once per Trial.
Even after Unbreakable got used, your Recovering speed is still increased by 25/30/35%, which is great, as your teammates can pick you up faster (because you can recover a lot, while they still run the Killer).
#6 Deliverance:

After performing a Safe Hook Rescue on another Survivor, the Perk activates. You now have a 100 % chance to unhook yourself during the escape attempt.
A successful Deliverance from the Hook triggers the Broken Status Effect for 100/80/60 seconds.
“I was raised by a strict man who taught me how to make the best of a bad situation.” — Adam Francis
Sometimes, there is no safe way for your team to unhook you, or it would take too long to hide from the Killer and to come for a rescue. Without bringing any Luck Offerings, the chance to escape from the Hook is only 4%, so almost impossible.
However, if you bring Deliverance and save another player safely during the Trial, you have a 100% chance to unhook yourself next time you’re on a Hook. Deliverance is also not affected by Perks that influence the chance of unhooking yourself.
#7 Iron Will:
You’re able to concentrate and enter a meditative-like state to numb some pain. Grunts of Pain caused by injuries are reduced by 50/75/100%.
Jake Park’s Teachable may seem not highly useful, but it definitely is. If you are injured, the Killer can clearly hear the character’s grunts, making it easy for him to find you. Iron Will makes those grunts completely silent on Tier 3.
There were many situations where I only escaped in the hatch because he couldn’t hear my gunts.
#8 Spine Chill:
An unnatural tingle warns you of impending doom. Get notified when the Killer is looking directly in your direction and standing within a range of 36 meters.
While Spine Chill is active, Skill Check trigger odds are increased by 10% with success zones reduced by 10%.
While Spine Chill is active, your Repair, Healing, Sabotage, Unhooking, Vaulting, Cleansing, Exit Gate Opening, and Chest Unlocking speeds are increased by 2/4/6%.
“There is a voice that doesn’t use words. Listen..” — Sassy, The Lost Tapes
There are quite a few information-type Perks available for Survivors, but Spine Chill stands at the top of them. Whenever a Killer directly looks at you, no matter which Killer, Spine Chill activates.
If you’re working on a Generator when Spine Chill activates, the odds of triggering a Skill Check will be increased by 10%, with a 10% reduced success zone. Repairing, healing, sabotaging, unhooking, vaulting, cleansing, opening Chests, and Exit Gates speeds are increased by 2/4/6%.
Combined with Resilience, players can achieve a 15% speed bonus on Repairing, healing, sabotaging, unhooking, vaulting, cleansing, opening Chests, and Exit Gates.
Note that the player has to be injured, and Spine Chill must be active.
Frequently Asked Questions (FAQs)
1. Can I only equip one Perk during a game?
Oh, not at all! Each survivor can equip up to four different perks. Mix and match for the most strategic combinations.
2. Are all perks available to every survivor from the beginning?
Interesting question. No, they’re not. Perks are often initially tied to a specific survivor and must be unlocked via the Bloodweb system. Once a survivor reaches level 30, 35, or 40, their unique perk can be unlocked for use by all survivors.
3. How do I get better at timing the usage of perks like ‘Dead Hard’ and ‘Sprint Burst’?
Practice makes perfect. But, here’s a tip. Be aware of your surroundings, and use these perks strategically when you’re in immediate danger or need a quick escape from the killer. Don’t just use them whenever they’re available.
4. What’s the significance of being the Killer’s Obsession?
Ah, that’s a juicy one! Being the obsession can be both a blessing and a curse. Certain killer and survivor perks revolve around the obsession mechanic, which can lead to powerful effects but also put you in the killer’s crosshairs.
5. What if the killer camps the hook, making perks like ‘Borrowed Time’ less useful?
Yeah, it can be tricky. But remember, while the killer is camping, your team has free reign to repair generators. Also, consider using perks like ‘Kindred’ to keep everyone informed of the killer’s actions.
Conclusion
In the thrilling world of Dead By Daylight, the key to survival lies in the strategic use of perks. As we’ve explored in this guide, the game offers a vast array of Survivor Perks, each with its unique advantages. From the life-saving ‘Borrowed Time‘ to the strategic ‘Decisive Strike‘, and the adrenaline-pumping ‘Sprint Burst’, these perks can significantly enhance your gameplay, making each escape from the killer a thrilling experience.
However, the effectiveness of these perks isn’t just about their inherent abilities. It’s about how you, as a player, leverage them in the heat of the game. It’s about understanding the killer’s strategies, anticipating their moves, and using your perks at the right moment. It’s about combining different perks to create a custom build that suits your playstyle and the unique challenges of each match.
Remember, not all perks are created equal. Some, like ‘Borrowed Time’ and ‘Sprint Burst’, are universally useful and can fit into almost any build. Others, like ‘Tenacity‘ and ‘Stake Out‘, are more situational and require a keen understanding of the game’s mechanics to be used effectively. And then there are the Teachable Perks, which can be unlocked for all Survivors, adding another layer of strategy to the game.
In the end, the best perks for you will depend on your playstyle, your understanding of the game, and the specific challenges you face in each match. So, experiment with different builds, learn from your experiences, and don’t be afraid to try new strategies. After all, in Dead By Daylight, adaptability is the key to survival.
In conclusion, the world of Dead By Daylight is a complex and thrilling one, filled with endless possibilities and strategies. Whether you’re a beginner just starting your journey or a seasoned pro looking to refine your game, understanding and effectively using Survivor Perks is crucial. So equip your perks, step into the fog, and may the Entity be with you.